

As the little green wise guy pictured above noted, merchandising is where the real money is made. From action figures and coloring books to underwear and bubble bath, just slap your property’s logo on it and watch the cha-ching roll in. Tabletop gaming is yet another such avenue for monetary gain. But that doesn’t mean the end product has to be a slapdash hack job. So this time around, we’ll have a look at four different games based on other properties, each from a different medium.

X-Wing
- $47.99 for 2 Players
- Ages 14+
- Designed by Jay Little
- Published by Fantasy Flight Games
What better place to start than with the granddaddy of merchandising exploitation. It’s been a long time since I’ve had any interest in the Star Wars franchise, though not because of any lingering resentment towards the prequels. As a matter of fact, I’ve always thought that the hostility of the fanbase towards those movies was overblown and largely unwarranted. My current disinterest is more because my tastes in science fiction have changed, and Star Wars no longer fits. All in all, it was an amicable split.

With the movies being so action-packed, there’s a wealth of possibilities to convert into a tabletop game. So what is one of the first things that comes to mind when you hear the name Star Wars? It’s the space battles, particularly the dogfights. Having been exposed to the more visually interesting thrust vectoring fighter combat from Babylon 5, the atmospheric-style maneuvers don’t excite the way they used to. Even so, a Star Wars movie isn’t complete without a space battle, usually during the climax. So when Fantasy Flight acquired the Star Wars license, reimplementing their defunct Wings of War miniatures game to feature Alphabet-Wings and TIE fighters instead of biplanes was a no-brainer.
Gameplay occurs over a series of rounds, each of which is divided into five phases. During the Planning Phase, players take the maneuver dials that correspond to the vessels in play and secretly choose a maneuver for each to perform. Some maneuvers will result in the vessel taking a Stressed condition (indicated by a red border). If a vessel is Stressed, it cannot use any maneuvers with a red border. A Stressed condition is removed by performing a maneuver with a blue border.

During the System Phase, certain vessels may use listed abilities which state that they can be employed at that time. Vessels act in the order of their Initiative, from lowest to highest. If two or more vessels on the same side have the same Initiative, the player chooses which order they act in. If there’s an Initiative tie between opposing vessels, it’s broken in favor of the side with the First Player token (which goes to the player whose starting units have the lower Squad Build point total).
During the Activation Phase, each vessel goes through a three-step process, acting in the same Initiative order as described for the System Phase. First, the maneuver dial for the vessel is revealed. Then that maneuver is executed. Rather than deal with the nonsense of the Squares vs. Hexes debate, X-Wing uses maneuver templates. One end of the template corresponding to the desired maneuver is placed against the front guides of the miniature’s base. The miniature is then moved to where the rear guides of the miniature’s base are placed against the other end of the template. Finally, the vessel may perform one available action if it’s not Stressed. As with maneuvers, some actions for certain vessels can cause them to become Stressed.

The Engagement Phase is where stuff potentially goes kablooie. While vessels act in Initiative order, for this phase they go from highest to lowest instead. To determine if an opposing vessel can be attacked, the player runs the range ruler against the firing arc of the attacking vessel. if the ruler comes into contact with an opposing vessel, it can be targeted. The attacking player rolls attack dice equal to the vessel’s attack value, while the defending player rolls defense dice equal to the vessel’s agility value. Each evade icon rolled on the defense dice is used to negate a hit or critical hit icon rolled on the attack dice, with all regular hits having to be negated before the same can be done to critical hits. If there are any hits left over, damage is applied. If the target vessel has any active shields, a hit is negated by flipping a shield token to its inactive side, starting with regular hits. If there are hits but no active shields, the vessels is dealt damage cards equal to the hits. Regular hits receive a facedown card, while critical hits receive a faceup card. Faceup cards apply a described hindrance on the vessel so long as it’s in play. Once a vessel has damage cards equal to or exceeding its hull value, it is destroyed, and its miniature is removed from play.
During the End Phase, any leftover tokens a vessel gained from performing an action earlier in the round are discarded. If applicable, charge tokens may be flipped back to their active side.

Victory conditions can vary depending on how you wish to play. The default mode is to dogfight until one side no longer has any intact vessels. But there are other potential scenarios to enact. The target for one side might be a convoy of transports the opposition is escorting which must be crippled before they can escape into hyperspace. Or maybe you could reenact the trench run from the first movie. The possibilities are only limited by your imagination. And of course, there’s a wide range of expansions that can allow for even bigger engagements. Just try not to overdo it.

Doomtown: Reloaded
- $39.99 for 2-4 Players
- Ages 14+
- Designed by Mark Wootton and David Williams
- Published by Alderac Entertainment Group
If there’s one thing that truly spurred my love of Weird Westerns, it was the Deadlands pen and paper RPG. As it came out in the mid-1990s, it also joined the wave of properties that attempted to cash in on the Collectible Card Game fad. However, I never got into it as I hate the CCG model and its inherent randomness. It recalls that one Peanuts comic strip in which Charlie Brown blows his week’s allowance on baseball cards, hoping for one with his favorite player. Him being Charlie Brown, none of the cards are for said player. Lucy then goes into the shop and buys one pack. And what do you know, it happens to have the very card Charlie Brown desired.
So it was with great relief when Fantasy Flight Games developed the Living Card Game model. With an LCG, each base set and expansion has identical cards in identical quantities. Many other companies followed suit, though they couldn’t call them Living Card Games as FFG had trademarked the term. Among the properties that applied this new model was Doomtown, now retitled Doomtown: Reloaded and referred to as an Expandable Card Game.

The game takes place in the town of Gomorra, California, which sits on a massive strike of ghost rock (the supercoal used to power infernal contraptions across the Weird West). And as far as the four major factions are concerned, this town ain’t big enough for the lot of them. Rather than be sensible and draw plans for a bigger town, they’re just gonna draw.
Somewhat atypical for a CCG or LCG, Doomtown: Reloaded is an area control game, where you move your forces to claim the turf of your foes while preventing the same from happening to you. The cards in a player’s deck come in four types: Dudes (which act as your game pieces when in play), Deeds (which form spaces in the play area), Goods (for equipping your Dudes), and Actions (self-explanatory). As well as any relevant stats and abilities, each card will also have a suit and value of a poker card. It is not necessary (or advisable) to construct a deck where no two cards have the same suit and value. However, each suit/value combination has a limit of four to a deck.

A game turn is called a day and consists of four phases. The Gambling Phase determines play order for the day and is resolved with a hand of lowball poker (that is the lowest hand wins). Players ante one ghost rock each (borrowing from the bank if necessary) and draw the top five cards from their individual decks, with the winner taking the pot. During the Upkeep Phase, players gain ghost rock income from their Homes and any Deeds they both own and control. The upkeep costs for any Dudes in play are then paid for (discarding those they cannot or will not pay for), as well as any loans from the bank incurred during the Gambling Phase. The meat of the gameplay occurs during the Noon Phase. Starting with the winner of the Gambling Phase and going clockwise, players take turns bulking up and maneuvering their forces, as well as having the occasional conflict. The day concludes with the Sundown Phase. Everyone totals their Influence (from their Dudes in play) and their Control (from the Deeds they currently control). Should a player’s Control total exceed the individual Influence totals of all the other players, that player wins. Otherwise, everyone may discard a card from their play hands and then draw back up to five cards, unbooting any Booted cards before starting a new day.
Two important mechanics to be familiar with are Booting and Pulling. During the Noon Phase, a card in play can become Booted, which is indicated by turning it sideways. For Goods and Deeds, this mostly serves as an indicator of the use of an ability which can only be used once per day. Dudes can become Booted for other reasons and are also more vulnerable to certain actions while in this state. Obviously, Dudes who are already Booted cannot perform actions that require them to become Booted. Pulling usually comes into play when using a Hex Goods card or purchasing a Gadget Goods card. When a Pull is called for, the player draws the top card from his deck. If its value is equal to or greater than the target number called for, the task in question succeeds. This is where one of the more potentially confusing aspects of the game crops up. Aces are treated as having a value of one and are effectively the lowest ranked card. For the sake of consistency, this applies to all aspects of the game where a card’s poker value comes into play. Since most people are accustomed to thinking of an ace as the highest ranked card, this could easily trip up new players.

During the Noon Phase, a player can choose from one of five options on his turn. Acting allows the use of an Action card or the ability of a card in play that has the keyword Noon. Shopping allows the placement of a non-Action card from the play hand by paying the indicated amount of ghost rock. Trading allows two Dudes in the same location to transfer a Goods card that isn’t a Hex, so long as the recipient is not Booted. Moving sends an Unbooted Dude to a new location. However, unless the destination is adjacent to the starting point, that Dude must become Booted upon arrival. Calling Out allows a Dude to challenge another Dude from a rival outfit in the same location to a Shootout. This can be refused by Booting the challenged Dude, who then slinks off to the outfit’s Home location like the yellowbelly varmint he is. A player who can’t or won’t perform any of these options can choose to Pass instead. The Noon Phase ends when all players consecutively Pass.
As with any proper Western, Shootouts are a key component. These are useful for lowering an opponent’s Influence total, as well as running off any lowdown scallywags on one of your Deeds (and thus regaining any Control points). Assuming the challenge wasn’t refused, both sides form up their posses. These can consist of any Dudes in the location as well as any Unbooted Dudes in adjacent locations, who become Booted upon arrival. Once the posses are assembled, both sides take turns performing any available actions with the Shootout keyword if desired and then choose a lead shooter.

The Shootout is then played out with a hand of poker. This is more involved than the poker in the Gambling Phase, as it requires that you calculate the Stud bonus and Draw bonus of your posse. Each Dude will have either a Stud rating or a Draw rating, indicated on the card by a number on a colored bullet (silver for Stud and bronze for Draw). The Stud bonus is equal to the lead shooter’s Stud rating (if any) plus one for each Dude with a Stud rating (regardless of the actual value). Draw bonuses are calculated in the same fashion with the Draw ratings. Once this is sorted out, both players draw a number of cards from their deck equal to five plus their respective Stud bonuses. They can then discard and redraw a number of cards up to their respective Draw bonuses. After discarding their hands down to five cards, both players reveal them.
Before the results are applied, either player can use any available actions with the Resolution keyword. There is also a special subset known as a Cheating Resolution, which can only be used when the opposing player’s hand has two or more cards with the same value and suit. Once finalized, the players compare the ranks of their hands, with the loser having to pay the difference of their ranks in casualties. If both players have the same ranked hand (regardless of the actual value of the cards), both pay one casualty each. Placing a Dude from your posse into your discard pile covers one casualty, while placing a Dude in Boot Hill covers two. However, once a Dude is in Boot Hill, that Dude can no longer be put into play, even if you have a duplicate in your deck. If both sides still have Dudes standing, another round may commence. However, if the previous round didn’t go so well for one player, there is the option of retreating (possibly with fist shaking and yelling, “Next time!”) by moving the remaining Dudes back Home, Booting any that weren’t already.

As you can see, the game can have a rather steep learning curve. As well as the counterintuitive nature of aces, the wide range of special abilities the different cards possess can be overwhelming for a new player trying to figure the best way to employ them. Therefore, it’s best for a player’s first game to be a two player affair. For one thing, this greatly simplifies the Influence and Control comparisons made at the end of each day. But more important is how resolving Shootouts can drag until you get the hang of them, leaving uninvolved players stuck twiddling their thumbs.
However, once you clear that hump, gameplay moves quite smoothly. With a bit of practice, performing actions and running Shootouts will become second nature and minimize analysis paralysis and player down time.

The Dresden Files Cooperative Card Game
- $39.99 for 1-5 Players
- Ages 12+
- Designed by Eric B. Vogel
- Published by Evil Hat Productions
For the past couple of decades, urban fantasy has developed quite a presence in the speculative fiction market. If you’re not familiar with the sub-genre, the basic concept of urban fantasy involves arcane phenomenon and creatures of legend existing in the modern world, though almost always hidden from the general public. While this may sound a lot like horror, the big difference is that the protagonists are largely in the know and are capable of fighting back.
If there’s a series that can be regarded as a standard bearer of urban fantasy, I’d say that it would be Jim Butcher’s Dresden Files, which follows the adventures of Harry Dresden, the only wizard listed as such in the Chicago Yellow Pages. Throughout the series, Harry goes up against vampires, necromancers, cultists, fallen angels, fae of both the Winter and Summer Courts, and many other supernatural beasties while having the backing of an eclectic mix of stalwart friends and uneasy allies. And in the Dresden Files Cooperative Card Game, players get to reenact the events from the novels.
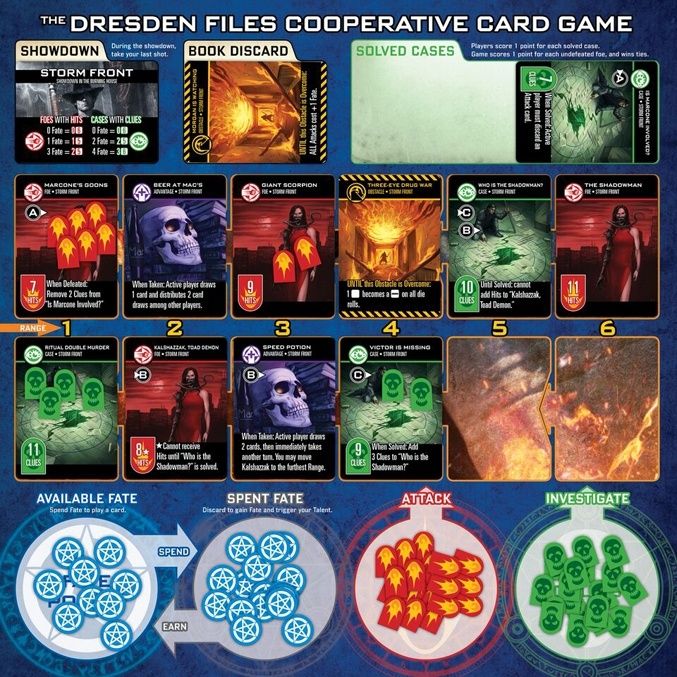
The play space consists of twelve cards dealt randomly into two equal rows from a deck themed to one of the Dresden Files novels. Each of these cards represent a situation from that volume which come in four categories. Foes are antagonists to whom you apply Hits with Attack cards to defeat them. Cases are mysteries to which you apply Clues with Investigate cards to solve them. Obstacles inflict a disadvantage of some sort until removed by playing an Overcome card. Finally, Advantages provide a one-time benefit when a Take Advantage card is played on it. A player’s turn consists of either playing or discarding a card from hand, using a Stunt (a character specific once per game ability), or passing. The game is won when there are more solved Cases than undefeated Foes.

On first blush, this makes the game sound really easy. But since this is based on a noir-inspired setting, as you can imagine nothing ever goes smoothly for Harry. First off, to play a card for its effect you need to spend Fate points, which come from a communal pool. With a couple of rare (and often scenario specific) exceptions, the only way to replenish this pool is by discarding a card from hand, gaining Fate points equal to what it would cost to play it. Doing this has the additional benefit of activating your character’s Talent. Another factor to keep in mind is that, again with a couple of rare exceptions, players do not get to draw more cards during the game. With all this in mind, players must carefully manage their hands of cards rather than fling them about willy nilly.
Then there’s the matter of range. Cards in hand will have a range listed on them limiting which cards in play they can be used on. The two cards at the furthest left in their respective rows are considered to be at Range 1, those to the immediate right are Range 2, and so on. Removing a card in play causes all those to the right of it to move one slot to the left and bring them within easier reach.

Pure random chance has its place as well. Many cards call for a dice roll to modify the Fate value, Range, or other value provided. However, you don’t use regular dice but rather Fate dice. Those who have played a Fate System role-playing game already know about these. If you’re not familiar, Fate dice are six-siders with two blank sides, two sides with plus signs, and two sides with minus signs. Each plus you roll increases the target value by one, while each minus reduces it by one.
Now 999 times out of a thousand, you will not have met the victory conditions by the time all of your cards have been played. That’s when you initiate a Showdown for one (or more) final roll of the dice. For each Foe with Hits and Case with Clues, you roll up to six dice and applying the difference if there are more pluses than minuses as Hits or Clues. You can spend any leftover Fate points to give you some automatic Hits or Clues prior to the roll. But as a rule, you get more certain results by spending them on Attack and Investigate cards.

As can happen with these random playspace setup games, a bad deal can make it look as if you’re screwed from the start. Certainly I have more than once screamed in frustration while playing the mobile app version when one or more Obstacles get dealt out at Range 5. But with clear communication between players and clever application of cards and Talents, even the direst situation has the potential to be manageable.
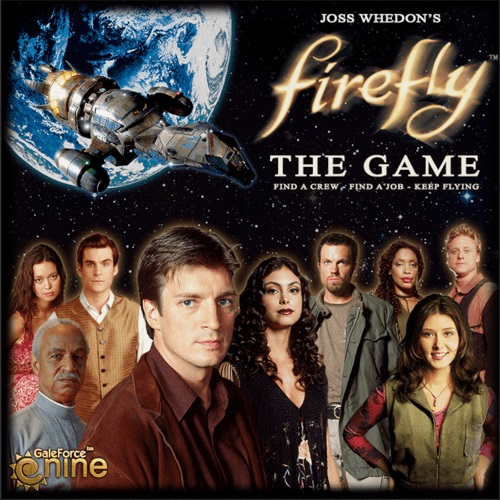
Firefly: The Game
- $60.00 for 1-4 Players
- Ages 13+
- Published by Gale Force 9
My personal relationship with Firefly is what you might call messy and complicated. The space Western motif was a huge draw, since I’m a sucker for Westerns with a weird twist (as my above noted fandom of Deadlands will attest). Not only that, but the theme of struggling to get by and keep your ship running injected a free trader element which had been mostly restricted to literary science fiction and Traveller campaigns up to that point.
On the negative side, the whole Academy subplot with its conspiracy undertones was unwelcome, as I felt it clashed badly with the space Western side. So I guess it was inevitable that I would find the 2005 movie to be a disappointment, since it jettisoned most everything I had enjoyed about the show while emphasizing what I disliked. Having said that, the focus on pick-up and deliver mechanics means that the game concentrates on the aspects which attracted me to Firefly in the first place.

Much like the characters from the TV show, a player’s goal is to take jobs and earn money to keep the ship running. On a player’s turn, up to two actions may be taken, so long as the same action type isn’t repeated. The four possible action types are Fly, Buy, Deal, and Work. Frequently skill checks will be required during these actions. This involves rolling a die and adding bonuses provided by the relevant Supply cards. Should the die come up a six, a second die is rolled, with the result being added to the total as well.
Of course, a ship isn’t a proper ship without a captain. There are seven different leaders from which to select. As well as providing some skill bonuses, each leader has a special ability which will either reduce the cost of purchasing certain Supply cards or provide an additional benefit from completing certain types of jobs.

Flying moves your ship around the game board and comes in two varieties. When you Mosey, your ship moves one space. While there’s no risk or expenditure of resources involved, it’ll also take forever to cover any significant distance. To make some real progress requires Full Burn. By expending one unit of Fuel, the ship may move a number of spaces up to the Range of the currently equipped drive. However, each space moved during Full Burn requires a draw from the appropriate Nav deck. This potentially provides a variety of encounters for good or for ill. Good ones usually provide an opportunity to scavenge derelicts or otherwise gain resources. Not so good ones can inflict breakdowns or even draw unwanted attention from either the Alliance or the Reavers.
Buying Supply cards is necessary to be able to complete all but the lowest paying jobs. At a Supply planet, a player may take up to three cards from the appropriate deck, drawing from the top and/or selecting from the discards. Of these, up to two may be purchased. Gear and Crew cards provide skill bonuses and will often possess an additional ability (though some of the cheaper Crew cards may have a disadvantage). Among the most expensive are the Ship Upgrades, which provide a variety of ways to pimp out your vessel and improve its performance. At the same time, you can purchase additional units of fuel and spare parts, each of which take up half a cargo space.

Dealing with Contacts at one of the Contact planets allows a player to obtain jobs to earn cash. Drawing Contact cards works the same as drawing Supply cards (draw three, keep up to two). Successfully completing a job results in becoming Solid with that Contact. In most cases this allows a player to sell scavenged cargo and contraband to the Contact at specified prices. Most Contacts will also provide some additional benefit when you have a Solid status with them.
Jobs are key to getting ahead and come in two varieties. Deliveries require that you pick up something at Point A and take it to Point B, which can be legal or illegal. Crime jobs require you to perform a task at the specified location and are always illegal. All but the lowest paying jobs require that you possess a minimum amount of certain skill bonuses and/or specific forms of Gear to complete. If these conditions cannot be met, the job cannot be taken. When a job is successfully completed, the listed amount of cash is received. At this point, each of your crew will expect to be paid an amount equal to their hiring cost. While you don’t have to pay all of them should you have some reason not to, this is a poor long-term strategy.

Though illegal jobs generally pay better, they also involve drawing and resolving one or more cards from the Misbehave deck. These introduce a variety of complications that crop up during the job. Each card provides 2-3 options that will require either a skill check or the possession of a Supply card. Depending on the results of the choice, there are one of three possible outcomes. Proceed allows you to draw the next Misbehave card or continue/complete the job if it’s the last card you need to resolve. Botch results in the job ending, though you can make another attempt on your next turn. If a Warrant is issued, the job ends in total failure. The Contact card goes to the discard pile, and you lose any Solid status you may have with the Contact from whom you obtained the job. While the individual Misbehave cards may look easy to resolve, it can be a tricky matter to successfully do two or more in a row. Therefore, jobs requiring multiple draws from the Misbehave deck should only be attempted if you have a large, well-rounded crew backing you up.
Keeping your crew happy is important if you don’t want them abandoning you at an inopportune moment. Certain actions taken can result in Crew becoming Disgruntled. The most common way to Disgruntle a Crew is to not pay them at the end of a job. Should a Crew who is already Disgruntled become Disgruntled again, the card goes to the appropriate discard pile. Though there are many ways to regruntle Crew, the most certain method is to go on shore leave at a Supply planet at the cost of $100 per Crew card you possess (regardless of how many actually are Disgruntled).

If this was all that the game had, it could easily get monotonous. This is where Story cards come in. At the beginning of the game, a Story is selected. This provides an overarching caper to accomplish as you try to keep your ship running. A Story will have one or more Goals to complete. Of all the stories which come with the game, I find the ones with multiple Goals preferable. The single Goal cards essentially boil down to, “Be the first to make X amount of cash.” Multiple Goal Stories give you something to accomplish besides raking in money. The rulebook recommends King of All Londinium as a good introductory story. I personally disagree, as I found the first Goal frustratingly difficult. Harken’s Folly struck me as more suitable for first timers. There’s also a single player option where your goal is to meet one of three possible criteria within twenty turns.
Opportunities for in-game player interaction are somewhat minimal. If two ships are in the same space, they can trade Supply cards as desired. This is also an opportunity to hire away any Disgruntled crew the other player may have. Otherwise, players just go about their business without interfering with one another. For those who don’t care for this sort of multi-player solitaire, I advise picking up the Pirates and Bounty Hunters expansion so long as you don’t mind games with excessive backstabbing.
